The Challenges of Lava Stone Packing in Tiled Floors
In many parts of Southern Europe, it was once a common practice to use lava stone or stone derivatives as a packing material under tiled floors. However, this type of flooring system has inherent problems that can lead to significant issues over time.
Instability and Tile Damage
The packing material used in this type of flooring is prone to shifting and moving, which can cause the tiles above to become unstable, move, and ultimately crack. This instability is a major concern, as it compromises the integrity and appearance of the floor.
Unsuitability for Heavy-Use and Sterile Environments
Lava stone or stone derivative packing is not suitable for floors in commercial buildings with heavy foot traffic or in sterile environments, such as hospitals. The instability of the packing material makes it unsuitable for these high-use areas, where a stable and durable flooring system is essential.
Lack of Economical Stabilization Options
Unfortunately, there is no economical way to stabilize the packing material used in this type of flooring system. The instability of the material is inherent, and attempting to stabilize it would be costly and ineffective.
Regulatory Concerns and Replacement Necessity
In many areas, especially in hospitals and other healthcare facilities, regulations require the removal and replacement of this type of flooring system. The instability and potential for contamination make it unsuitable for use in these sensitive environments.
Ineffectiveness of Partial Repairs
Attempting to repair sections of this type of flooring is not a viable solution. Repairing only a portion of the floor will result in damage between the repaired section and the existing floor, as the instability of the packing material will continue to cause issues.
In conclusion, the use of lava stone or stone derivative packing under tiled floors is a problematic practice that can lead to significant issues over time. The instability of the material, its unsuitability for heavy-use and sterile environments, and the lack of economical stabilization options make it necessary to remove and replace this type of flooring system, especially in regulated environments like hospitals. Partial repairs are not effective and can even exacerbate the problem.

Remediating Unstable Tiled Floors: A Comprehensive Approach
Given the inherent challenges associated with lava stone or stone derivative packing under tiled floors, it is clear that a comprehensive remediation approach is necessary to address the issues effectively. The good news is that with the right expertise and techniques, these problematic floors can be replaced with a stable and durable solution.
Complete Removal and Preparation
The first step in the remediation process is to remove the existing tile and packing material completely, down to a stable substrate. This ensures that the new flooring system will have a solid foundation, free from any unstable or compromised materials. Once the removal is complete, the affected sections should be thoroughly cleaned to prepare for the installation of the new packing materials.
Achieving the Desired Floor Height
When replacing the flooring system, it is essential to ensure that the new packing materials are installed to match the existing floor height. This may require the use of leveling compounds or other specialized products to achieve a seamless transition between the new and existing floors. By carefully considering the floor height, you can avoid potential tripping hazards or unsightly transitions.
Choosing the Right Packing Materials
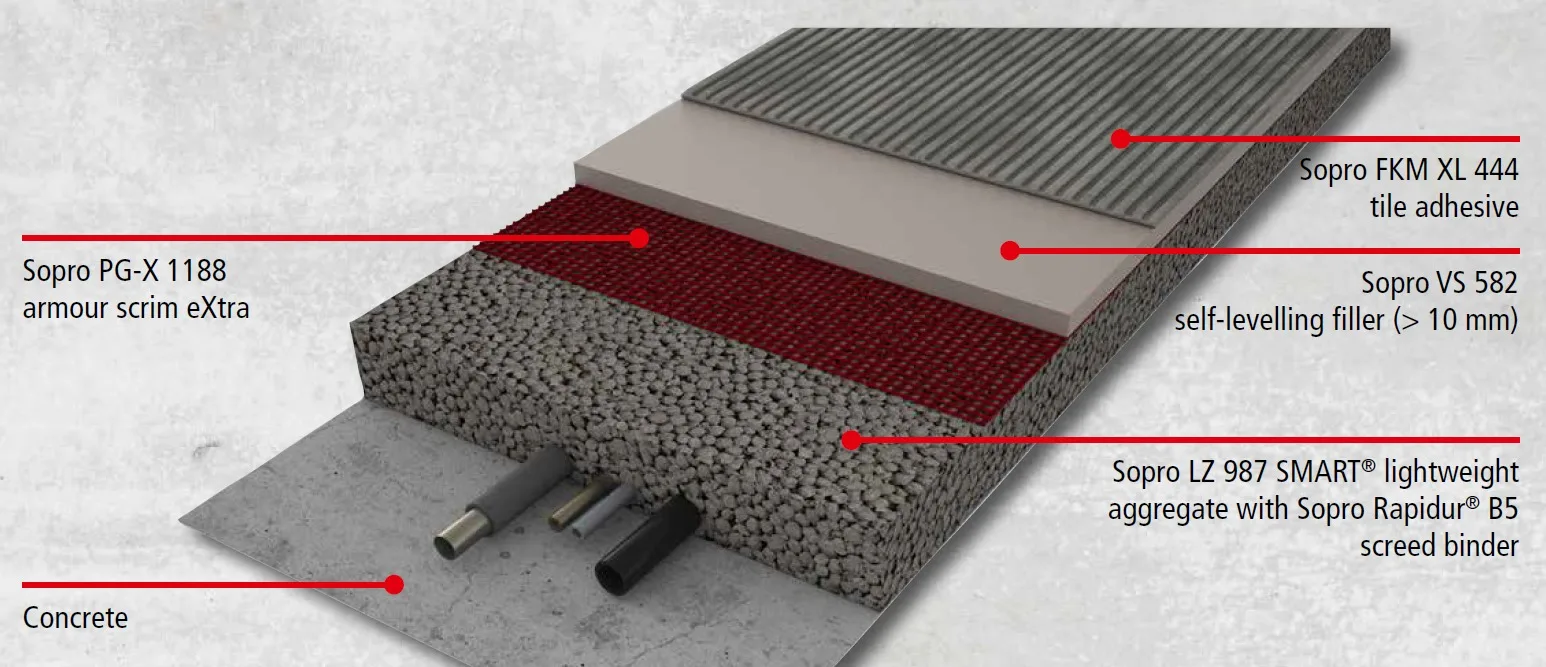
The selection of the new packing materials is crucial to the success of the remediation project. It is essential to choose materials that are stable, durable, and suitable for the intended use of the space. We recomend the use of: SOPRO SMART LZ which is a lightweight mineral aggregate made from expanded glass granulate for use inconjunction with Sopro Rapidur® B3 or Sopro Rapidur® B5 rapid-set screedbinders to produce highly thermally insulating, early overcoatable, light-weight levelling layers. The solution is suitable for all coat thicknesses upwards of 20 mm inbonded construction. As alternative to board subfloor systems. For filling pipepenetrations, large voids and sanitary service runs/assemblies. Ideal for refur-bishment/renovation contracts. Also suitable for use as loose fill. Componentin Sopro SMART® system in conjunction with Sopro PG-X 1188 armour scrimeXtra and Sopro VS 582 self-levelling filler.
Professional Installation for Long-Lasting Results
To ensure the success of the remediation project, it is recommended to work with experienced flooring professionals who have expertise in installing tiled floors with packing materials. These professionals can provide guidance on the best installation techniques, ensure that the new flooring system is properly secured to the substrate, and help you avoid common pitfalls that can lead to future issues.
By following a comprehensive remediation approach that includes complete removal, thorough preparation, careful consideration of floor height, the selection of appropriate packing materials, and professional installation, you can effectively address the challenges associated with unstable tiled floors and create a stable, durable, and attractive flooring solution that will serve your needs for years to come.

Fix perimeter insulation strip.

Mark datum line and reference points in accordance with required installation levels: Sopro SMART® lightweight levelling layer (> 20 mm 1)), Sopro VS 582 self-levelling filler (> 10 mm), adhesive coat and ceramic thickness.

Mix 18 kg Sopro LZ 987 SMART® lightweight aggregate with approx. 12.5 kg Sopro Rapidur® B5 rapid-set screed binder and approx. 6.5 – 7.5 ltr water. Use of a forced-action mixer is recommended for larger areas.

Place Sopro SMART® lightweight levelling layer in the same way as the conventional screed.

Additionally, compact the surface of the placed material and remove any raised areas and smooth.

Sopro PG-X 1188 armour scrim eXtra may be installed after approx. 12 hours. Lay sheets with 5 cm lap.

Then place Sopro VS 582 self-levelling filler (min. 10 mm 2) coat thickness when fully cured). Pour filler bucket-wise from a low height, working in the same direction as laps between sheets. Place material as accurately as possible to required levels or with only slight excess.

The surface is walkable and ready to receive ceramic covering after approx. 3 hours. 2) To achieve a strong bond and interlock between the self-levelling filler and Sopro SMART® light levelling layer, the filler penetrates slightly into the top part of this layer. This extra material must be factored into consumption rate calculations.
